SITE SURVEY NOTES:
What you are looking for, at the survey site, are the following:
Climate and exposure
Site drainage, water flow, ground water
Soils and slope
Windbreaks and wind tunnels
Existing plants and weeds as indicators
Utility lines
With this information, you can then design the garden with consideration for:
Access and flow, paths and walkways
Borders, walls & fences, edging, delineation of spaces
Furnishings and lighting
Usable space, patios and decks
Fire and cooking spaces
Recreation, kids and pets
Relationship to surrounding architecture, neighborhood, wild lands
Safety, views, and privacy
In this site survey exercise, you are going to pick out an area and examine it closely. Usually, in class, we walk around the campus and pick out three gardens. We work on it together, then work up to doing it all by yourself. Now, it’s all up to you from the get go. Straight to the deep end of the pool. Let’s try it!
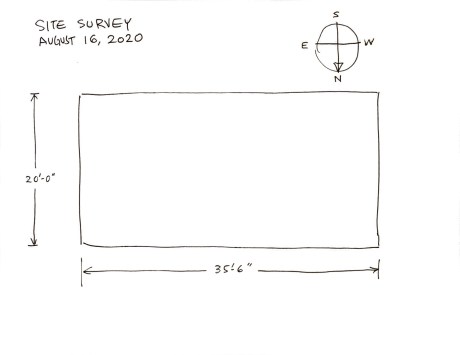
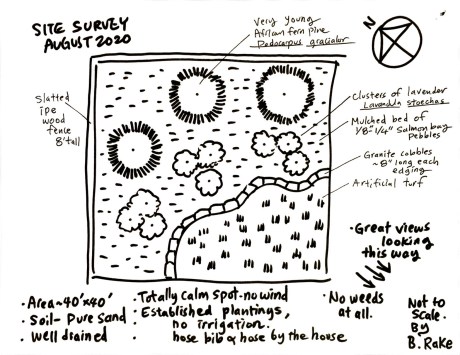
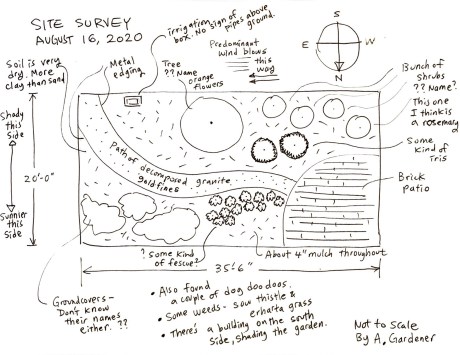
So do a walkabout and find your spot. It can be your yard, a neighbor’s front yard garden (ask permission), a small mini park. Make sure that it is not too big. Not too small. A rectangular garden or lot is helpful because it is easy. You can find a two acre, full of trees, up and down the mountain slope lot to do later. In the beginning, keep it simple and manageable – more or less flat, easily delineated shape. Sometimes we will just do this little rectangle of a north facing bed in front of our department:

Now take out your tape measure and get the length and the width. Write that down like so:

Now take a compass reading. You may be an old timer that still carries a compass or you can use the one on a smartphone. A paper map might work too. Draw a compass rose next to your site indicating the directions. This is really important for the plants!
Now for the tricky part. What is the exposure? Which way does the land or the plants face? Okay back up. If you are out in an open field, with nothing but the sun traveling overhead, you have 360 degree exposure, correct? Well sort of. In the middle of summer the sun’s path is directly overhead and it ‘ll burn ya pretty good. But as the season goes towards fall and winter, the sun’s path falls lower and lower in the sky in relation to you, in the open field. The sun will be shining at you from the south, casting a long shadow. This is cause of the tilt and wobble of the earth and us being here north of the equator. The days become shorter, sun sets at 5:30 pm instead of 9 pm. Stuff doesn’t dry out as much, and so on.
So on the worksheet for Exposure, turn yourself into a tree rooted in one place, in the plot your are surveying. Which way are you exposed? Put your back towards where it is protected (shaded by a fence, a building, etc) and face out. Now figure out your north south east west, and use your arms and hands to make the arc in the sky for the path of the sun. Its summer, straight overhead. Now make that arc go lower and lower. See how that house over there starts to block your winter sun, see how the sun might come right through the canopy of that deciduous Magnolia cause by then its leaves will have all dropped. Something like this. Get into this habit. Say you are out on a date walking around town. Just see a spot. Stop, turn into a tree, and visualize what kind of exposure it gets over the course of a year. Just like that.
Longitude and latitude is also helpful when deciding plant choices. Plants from similar latitudes often have similar light requirements. You can find these coordinates on the maps feature of smartphones. Imagine the whole globe planet as a grid, that is the longitude and latitude.

Thermal mass is the ability of a material to absorb and store the heat energy. We are usually talking about building materials. A dense material like concrete or earthen walls can take in a lot of sun heat energy during the day, then slowly radiate it out as night falls and temperatures drop. These materials have high thermal mass. Wood does not have high thermal mass and so log cabins can get cold really quick, especially if the chinking is loose and the wood stove is not very efficient. Imagine you lived in a metal house that heated up quick and got cold just as quickly. Not good. Thermal mass is a very important consideration for plants because that thick brick wall in the garden can create a little microclimate of warmth that is perfect for your lemon tree or tomatoes. Not only does it serve as a windbreak, it also serves as a nice warm heater.

When you do the survey of the soil you ought to have a shovel to dig around. That is how you will know what kind of soils you have – sand or clay, dry or wet, and so on. When doing these site survey consults, my buddy Gus Broucaret brings a soil probe which is a long tube with a T handle that sucks out a core sample of soil. He also says to wear glasses and put some chalk in your hair to look distinguished and smart, but I am not sure about that. But watch where you dig and do not go too deep because you might hit a utility line of some kind (more on that later). This being Bay Area California, in general, this is the driest time of the year (August September), hasn’t rained since March or April. So the soil will reflect that. Oops there was just a thunderstorm of lightning and thunder that came out of who knows where. So just remember, you can make all the generalizations and predictions you want, but mother nature does what she wants to do, and you don’t know until you get your hands dirty what is really up.
If you can, do the soil feel texture test, do the soil drainage test, send some soil away to a lab for analysis. Do you have a layer of clay hardpan at 14” below? Is there a bunch of plywood and rubble and plastic trash the contractor buried and covered with a thin layer of dirt? When you put a water hose to the soil does the water just roll off the soil without getting it wet underneath at all (soil is hydrophobic)? All of these will make a difference in plant selection and placement, in hardscape designs. But you do not have to learn it all in one sitting, just start to take notice and get your hands in there.
In order to prevent weeds, many places use extensive mulch and install a layer of plastic woven cloth underneath to suppress the weeds (weed cloth). So if you see wood chips mulch, scrape a little away to see how thick it is, and if the weed cloth is working. Often, landscapers will put down a one inch or less layer of mulch as a finishing touch to the plantings, then go collect their check. Then in two or three months, the mulch is blowing away and all you are left with is the black weed cloth emerging in patches. Or ditto for when mulch is placed on the slippery plastic weed cloth on a slope. It all falls down… An ideal mulch used to suppress weeds and keep in the soil moisture should be at least 3-4-5 inches deep.

Enough of soil. Now figure out water and irrigation. Here in these parts our rains come mostly in the winter months, November December into March April. That is the time to pay attention to the rainfall. Best if you can be out in the rain with an umbrella or rain coat when it comes down. Otherwise, you gotta look for hints and clues and be a detective. Look for the rain gutters to the house – does the downspout pipe lead to the sewer underground? Or does it spill out somewhere next to the driveway or the back stoop? Given the slope and contours of the house and the garden, where does water gather naturally? Where are the low spots? Which way is the flow? You might see stains on the concrete from water sitting, or feel a persistent wetness on one side of the deck. Is there a grated drain or a culvert that directs the water? How much of the landscape is permeable? That is to say, when it rains, is water able to go (infiltrate) into the earth, or does it gather force and volume on a big ol slab of concrete and go somewhere? Where?! Where do you think the water goes after it emerges from the downspout here?

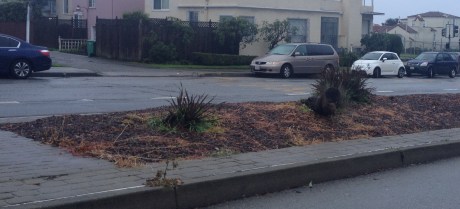
Now go find the hose bib, and any irrigation if present. That is to say, look for an irrigation clock (maybe indoors inside the garage, under a car port), locate the irrigation valves and or irrigation boxes. Try to ascertain the path of pipes and hoses that may be underground or slightly buried under mulch or up on top of the soil. If you know how to work irrigation try the bleeder valve, turn it on at the clock, and so on. If you do not know irrigation no worries. Just mark the general location on your survey plan and move on. Take another class another day. Heres some irrigation lines before they get all covered with mulch and you can’t see them anymore:

Lastly talk to the client and neighbors and locals, if they are present and friendly. They will know if the street was built over an old riverbed full of heavy mud and clay. They might be able to tell you that there is an underground spring that runs through the middle of the yard at not much more than 2 feet down. They might also share the detail that two hundred yards of french drains wrap all the way around the foundation but that it is old and water is seeping again into the basement. So on and so forth. The plants talk too if you would listen. There are indicator plants that show where drainages converge and the water table is high. Any aborigine hunter in Australia knew that that was the key to survival. Around here when I see the arroyo willow or the red elderberry shrubs, I know that water is not too far below. Here at the base of this dry hillside is Salix lasiolepis:

The old time trick was to stick a wet saliva-dipped finger into the air; the finger would cool and dry and you would know what direction the wind was coming from. This was all important if you were hunting in the field and you did not want an animal to smell your stinky human scent and be off running before you even had a chance at a shot. This way you could approach from down wind of your quarry, not have your scent blown right to it. Nowadays they actually sell baby powder in a bottle to puff up in the air and figure out which way the wind is moving.

So stay still and document which way the wind is coming from at your survey site. Again, like the seasons, like the sun, like the time of day, wind is variable. Likewise, the plants tell the story. Look for the street tree that has a lean. The wind will blow the trunk a little sideways. The canopy and leaves will be predominately on the downwind side. There may be a little buttress at the base for the tree to anchor and steady itself. Look for where the fallen leaves gather, that is likely a still spot. It is one thing to generalize and say okay the wind in San Francisco is onshore and blows west to east, from the ocean inland. But in any individual yard that direction will vary. The wind might be traveling through a little windy gap between houses and carve around a corner. The wind might swirl in circles over a fence through a hedge and putter beside a shed. Which way do you think the wind is blowing?

Some plants like a little protection from the wind, some plants don’t mind the wind at all. In places with very still air some plants become susceptible to pests – first the scales and aphids, then the sticky poop and powdery mildew fungus, and of course the ants. Air flow is an important factor in the design of a garden palette.
Plants. Try to identify and mark on your rough little plan the existing plants. Usually when we are with clients we try to find out which plants they want to keep, and which plants they would like to get rid of. For this exercise, just mark the main trees or shrubs. You draw em like this, write down the name if you know it:

Do not be concerned at this point if you do not know the names of all the plants. There is another class for that it is called Plant Identification. Infinite lifetimes would not be too many lifetimes to try and learn the 300,000 plus plants and how to grow them.
You can always tell when somebody sprayed the weeds. Cause one day they are green. Then they all go yellow and brown.
Aside from all this natural phenomenon, the last aspect of the site survey is the presence or absence of human made structures and utilities. Describe and draw any decks, patios, benches, tables. Human spaces. Keep an eye out for electric lines and right of ways. In some neighborhoods, the electric power poles are in the backyard along an alleyway, in others the electric cables are underground. There might be high voltage wires up at the top of a power pole and so no, you do not want to plant a fast growing tree underneath them. The sewer pipe usually runs to the front of the house by the sidewalk, but because of a slope, or the orientation of the road, it may run through the backyard down the hill. So no, you do not want to dig there too deep either whether to put in a retaining wall or footings for a gazebo. Cables passing through the backyards to the house:

There is a section at the end of your site survey about common landscape pests. Pigeons, rats, seagulls, raccoons and the like. They will be interacting with the garden you design. So best take them into account also. Notice how this design feature had to have a little followup to keep guano at a minimum:

Look at the space from all the angles. As a plant within it. From the sidewalk as a member of the general public. From inside the house out the window. From inside the house on the second floor. Go low and look up. Go high and look down. Gather a myriad of perspectives.
Well that is a lot to digest for a first time designer. It will all come together with practice and time. Be aware, observant, and attuned to the world and it gets easier. People will be like wow you got skills and you will be like just look! The signs are everywhere! For now your site survey drawing may look something like this:
or this:
or this:
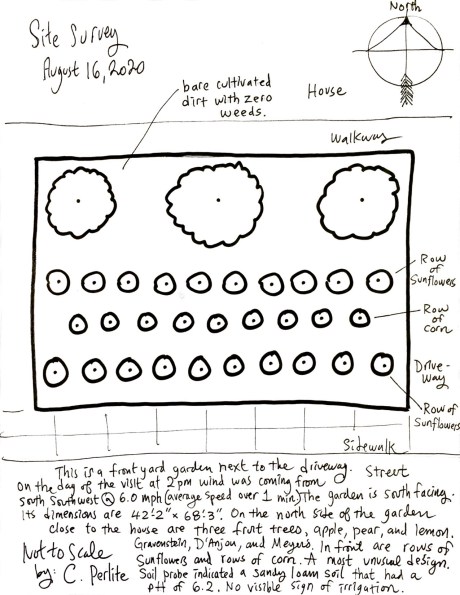
Hey! This is not a presentation drawing. This is an initial site survey, like when you meet a new friend and jot some information down. It is a casual exercise. It can get messy with notes! If it is well spaced out and somewhat organized that is good. You may not see everything the first time around. Go back again. Take some pictures. Get to know it. Takes time…
